你好,我是杨文坚。
回顾我们之前的几节课,讲的都是Vue.js 3.x的入门级操作。从这节课开始,我们将以Vue.js 3.x 组件库的开发为线索,展开Vue.js 3.x企业级项目的进阶学习。
作为一个前端开发者,你肯定对前端组件库并不陌生。相信你在用Vue.js或者React.js开发实际项目时,或多或少都使用过相关开源组件库,例如Vue.js的ElementUI组件库和React的Ant Design组件库。
前端组件库的出现是为了方便我们实现更多的样式和交互效果。毕竟JavaScript + HTML + CSS的原生技术能力比较有限,如果基于原生技术能力来实现网页的样式和交互效果,要付出很大的工作量。而组件库能让前端开发者省去这部分工作量,直接进入页面的功能开发。
Vue.js 3.x 有很多现成的开源组件库,例如Element Plus和Ant Design Vue等都可以直接拿来用。为什么我们还要自己学Vue.js 3.x 的组件库开发呢?
自研开发Vue.js 3.x 组件库能带来什么?
**一方面是定制化的需要。**企业产品必定是根据客户或者业务的特色量身定制的,也就是说它有一定的自定义性质,而开源的组件库不一定能满足所有定制化的前端功能。
这个时候,作为前端工程师,你就必须掌握自研组件库的开发能力,为可能出现的定制化组件的要求做好准备。
另一方面,也能锻炼和提高自己的技术能力,提升工作效率。
自研组件库的过程中,我们需要考虑很多的技术问题,例如“如何让组件库能开箱即用?”“如何能让组件库能定制化主题?”“如何保证组件库里所有组件的复用性和通用性”等等。在实现组件库过程中,你还需要考虑和解决很多业务外的技术问题,这是一个非常好的锻炼技术能力的机会。
而且,组件库开发到最后要沉淀一套UI框架,让以后项目直接复用,这就大大减少了以后重复性开发的工作量。例如现在组件库开发了一个通用对话框组件,以后其它项目就不需重新开发,直接复用就行。
说了这么多自研组件库的好处,那我们要怎么学习Vue.js 3.x 自研组件库的开发呢?有哪些开发要点呢?
Vue.js 3.x 组件库开发要点
Vue.js 3.x 组件库的核心作用是可以给其它项目复用。既然是复用,那么标准做法就是将组件库封装成npm模块进行使用。
所以这个时候,我们就需要考虑将组件库里的Vue.js代码编译成JavaScript文件,保证能支持引入组件库npm模块的同时,还要能自动识别TypeScript类型、支持ES Module和CommonJS模块格式、组件按需加载等操作。
总体来讲,这里可以划分为三个技术要点:
- monorepo管理组件代码;
- Vue.js 3.x 源文件的多种模块格式编译;
- 基于Less开发CSS样式文件和独立编译。
先看第一点,monorepo管理组件库代码。
我们在企业中开发组件库的时候,并不会像开源组件库那样,一概而论地将组件库划分为基础功能组件(例如Button组件、Dialog组件),而是要考虑到多业务场景类型,划分成基础功能组件类型、某某业务组件类型等。
这个时候,我们就需要把组件库划分成多个npm模块进行输出管理,同时需要尽量用一个代码仓库进行维护,因为不同类型的组件可能存在互相依赖或者引用的关系,要保证能在一个代码仓库中快速调试多个npm模块的代码效果。一个仓库管理多个npm模块(多个子项目),就需要用到monorepo的项目管理形式。
第二个要点,了解Vue.js 3.x 源文件的多种模块格式编译。
刚刚提到,组件库是以npm模块的形式提供给其他开发者使用的。开发者在使用组件库的时候,可以有多种JavaScript模块的使用格式,常见的是ES Module和CommonJS模块格式,所以我们也要将源码编译成ES Module和CommonJS格式。
但开发者在使用组件库的时候,不可能一次性把npm模块中所有组件都打包进业务项目,这样做会导致业务项目代码编译结果的体积非常大。为了避免冗余代码结果,我们必须支持组件库能够按需加载使用。这时候就需要每个组件独立编译,输出单独的文件,也支持使用者在自己的业务项目中单独使用某个npm里的某个组件。
上节课我们提到,保证企业项目中代码质量,有一点就是用TypeScript进行开发,但编译后的npm模块是JavaScript代码,怎么能让使用者识别到组件库的代码类型呢?这时就需要在输出JavaScript的npm模块里,加上编译输出组件库的JavaScript的TypeScript类型描述文件 (*.d.ts文件)。
第三点,基于Less开发CSS样式文件和独立编译。
前面说过,企业级的业务项目有很多定制化的需求,特别是前端页面的主题定制化能力,甚至是同一个企业内不同业务项目的主题定制都不一样。
考虑到要支持主题配置,我们采用Less来进行“编程方式”开发CSS。因为原生CSS是静态文件,不能像JavaScript那样有丰富的动态脚本能力可以执行动态的内容,例如函数复用、循环逻辑等特性,导致开发复用度高的CSS样式需要写很多重复性的代码。所以,这时候要让CSS能“编程化”,可以使用Less这个CSS的“预处理语言”。
Less是CSS的“预处理语言”,意思是可以让CSS像写JavaScript那样支持变量、循环、继承和自定义方法等多种特性,极大提高CSS的开发效率和样式复用率,最终再通过工具编译成CSS代码。
这里,考虑到组件也是按需加载,所以不同组件的CSS样式内容也要独立拆分。
到这儿,Vue.js 3.x组件库自研的开发要点就分析得差不多了,接下来根据三个要点我们一一讲解相关的技术实现,先来看如何搭建monorepo项目。
如何搭建monorepo项目?
从前面的分析中,我们多少可以了解到,monorepo项目就是一个仓库管理多个子项目的概念。在前端领域中,用monorepo管理同仓库多项目的方案有很多种,例如传统的Lerna技术方案、最近一两年比较流行的pnpm管理方案。
既然有这么多方案,那要怎么选择呢?我们可以参考Vue.js官方在GitHub上的代码仓库 https://github.com/vuejs/core 的monorepo方案选择,就是用pnpm来管理monorepo项目,主要利用pnpm天然支持monorepo的管理能力,同时pnpm安装node_modules也能更省体积空间。
现在我们开始进入基于pnpm的monorepo方案的实现操作:
- 初始化代码目录;
- 基于pnpm配置monorepo项目;
- 安装所有子项目依赖。
先看第一步,初始化项目的代码目录,项目的代码基础目录如下所示:
1
2
3
4
5
6
7
8
9
10
11
12
| .
├── package.json
├── packages/ # 多子项目的目录
│ ├── business/ # 业务组件库 - 子项目目录
│ │ ├── package.json # 业务组件库 - 子项目package.json声明
│ │ └── src/* # 业务组件库 - 子项目源码目录
│ └── components/ # 基础组件库 - 子项目目录
│ ├── package.json # 基础组件库 - 子项目package.json声明
│ └── src/* # 基础组件库 - 子项目源码目录
├── pnpm-workspace.yaml
├── scripts/*
└── tsconfig.json
|
我来讲解一下上述目录中各自的作用:
- 根目录的 package.json 主要是用来声明公共的操作脚本和公共的开发编译所需的npm模块;
- packages/* 目录用来管理多个子项目,每个子项目都有各自的package.json项目声明文件;
- pnpm-workspace.yaml 是pnpm管理项目的配置文件;
- scripts/* 目录是用来存放项目通用编译脚本的;
- tsconfig.json 是用来声明TypeScript的项目配置的。
目录初始化还有一个最重要的点,就是对主项目和子项目目录下的 package.json依赖的初始化,我们现在对两个子项目的package.json文件进行初始化。
我们先初始化“基础组件库”子项目的 packages/components/package.json文件,如下面代码所示:
1
2
3
4
5
6
7
8
9
10
11
12
13
14
| {
"name": "@my/components",
"version": "0.0.1",
"main": "dist/cjs/index.cjs",
"module": "dist/esm/index.mjs",
"types": "dist/esm/index.d.ts",
"devDependencies": {
"vue": "^3.2.39"
},
"peerDependencies": {
"vue": "^3.2.39"
}
}
|
上述代码中,我们给“基础组件库”子项目加上了“@my”这个私有前缀名称。这个是可以自定义的,你可以根据自己所在企业npm源站可使用的前缀名称进行定义,方便统一命名子项目,后续的其他子项目也可以加上同样的 “@xxx/”的前缀进行统一命名。
注意,这里使用 “@xxx/”这类私有命名前缀不是必要的操作,但是为了方便管理子项目npm模块名称,一般都要加上这类命名前缀。
接下来,我们来初始化“业务组件库”子项目的 packages/business/package.json文件,如下面代码所示:
1
2
3
4
5
6
7
8
9
10
11
12
13
14
15
16
| {
"name": "@my/business",
"version": "0.0.1",
"main": "dist/cjs/index.cjs",
"module": "dist/esm/index.mjs",
"types": "dist/esm/index.d.ts",
"dependencies": {
"@my/components": "^0.0.1"
},
"devDependencies": {
"vue": "^3.2.39"
},
"peerDependencies": {
"vue": "^3.2.39"
}
}
|
在“业务组件库”子项目这个npm模块依赖里,我们使用了“基础组件库”子项目模块 “@my/components”。其实npm站点上并不需要存在这个模块,后续通过pnpm进行monorepo的管理,实现项目子依赖模块@my/components 直接指向和引用 packages/components的代码。
第一步完成,我们进行第二步,基于pnpm配置monorepo项目。
在 pnpm-workspace.yaml 这个文件里,进行monorepo的项目配置,具体代码如下所示:
声明 packages/* 目录是用来管理所有子项目的。
接着是第三步,安装所有子项目依赖。这里我们要先保证本地电脑有全局的pnpm命令,可以通过以下脚本进行安装:
最后再在项目的根目录下执行:
就可以实现monorepo项目的依赖安装和管理了。
pnpm安装依赖过后,如下图所示:
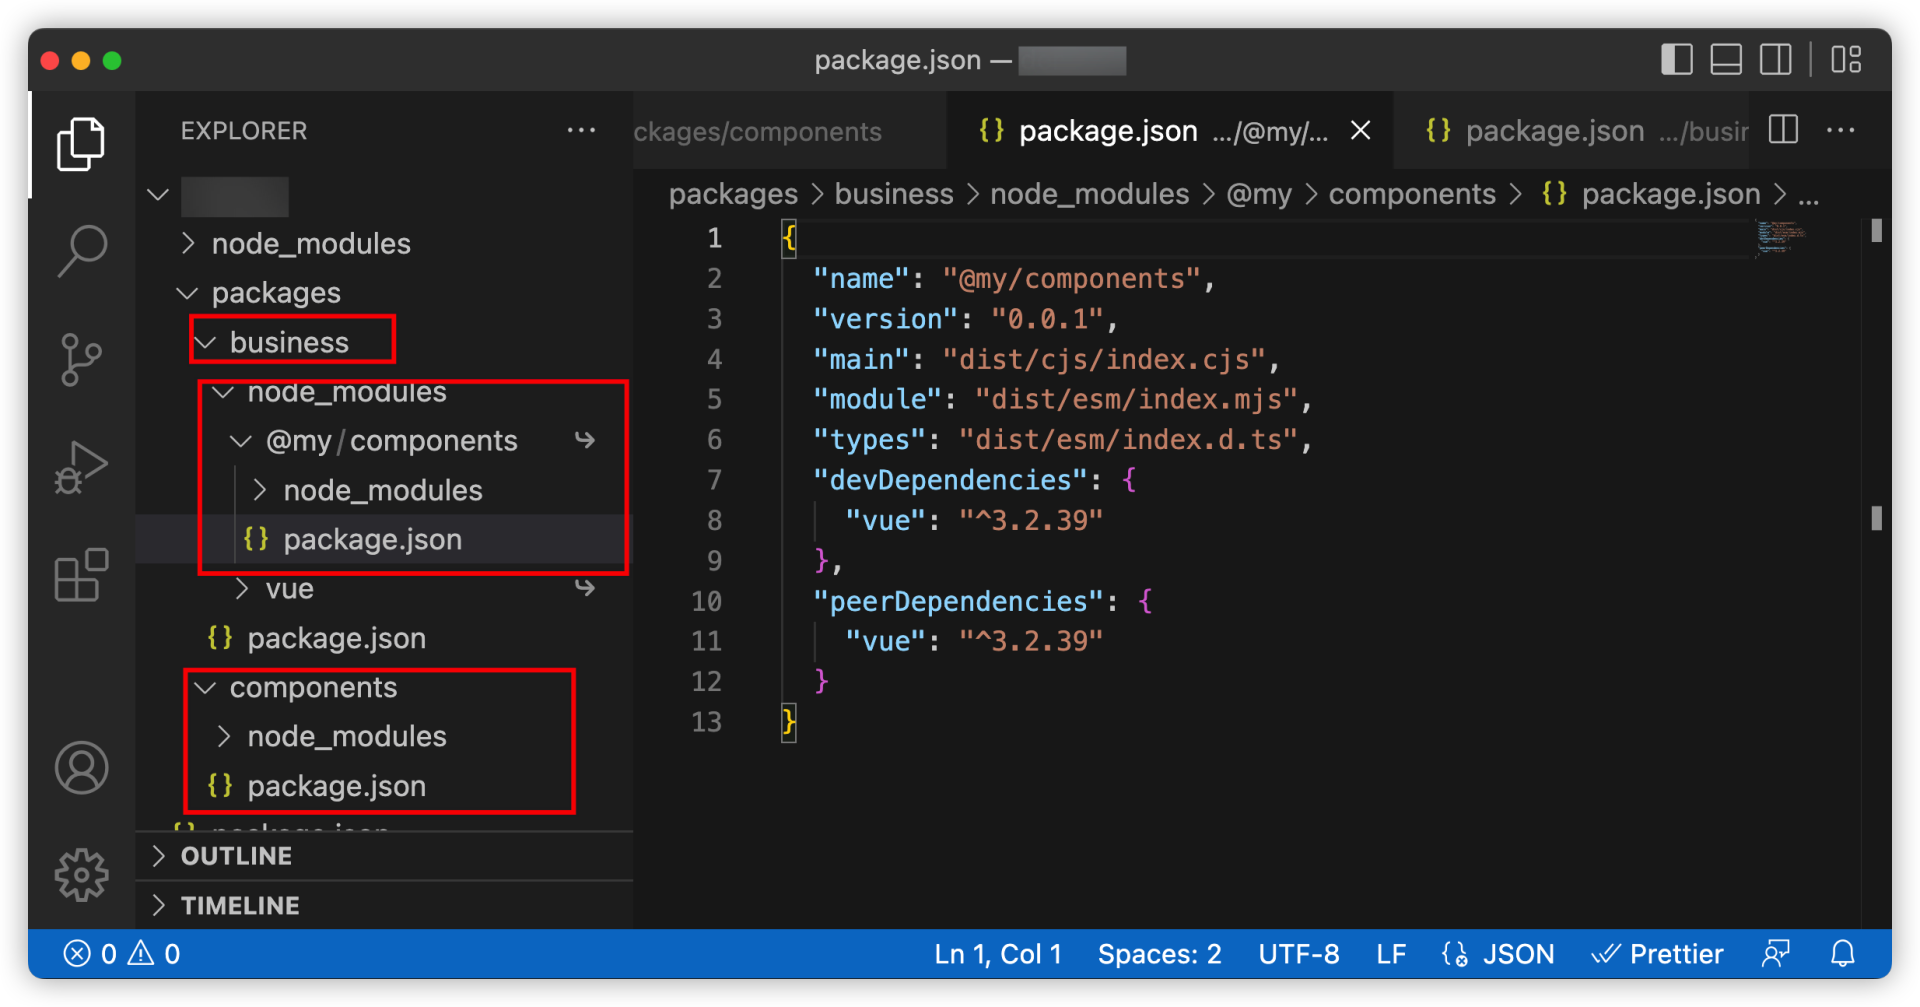
业务组件库子项目(@my/business)里依赖了基础组件库的子项目(@my/components),通过 pnpm管理的monorepo项目方式,将依赖的@my/components 子项目通过“软链接”形式指向了真正的 components/* 目录。
monorepo里有“软链接”实现子项目的npm模块依赖关系,我们就可以放心拆分不同类型组件库,以及管理不同类型组件库的嵌套依赖关系了。
怎么对组件库做编译设置?
实现了多种类型组件库项目聚合的monorepo项目目录,我们就要开始准备各个子项目的初始化源码和源码的编译脚本。
我们可以这样设计子项目里组件库的文件目录格式:
1
2
3
4
5
6
7
8
9
10
11
12
13
14
15
16
17
18
19
20
21
22
23
24
25
26
27
28
29
30
31
32
| .
├── README.md
├── env.d.ts
├── package.json
├── packages
│ ├── business/
│ │ ├── package.json
│ │ └── src/ # 业务组件库 - 子项目源码目录
│ │ ├── comp-000/ # 业务组件 - 单独组件目录
│ │ │ ├── xxxx.vue
│ │ │ ├── index.ts # 业务组件 - 组件索引文件
│ │ │ └── style
│ │ │ └── index.less # 业务组件 - 组件样式文件
│ │ ├── comp-001/*
│ │ ├── comp-002/*
│ │ ├── index.less
│ │ └── index.ts
│ └── components/
│ ├── package.json
│ └── src # 基础组件库 - 子项目源码目录
│ ├── comp-000/ # 基础组件 - 单独组件目录
│ │ ├── xxxx.vue
│ │ ├── index.ts # 基础组件 - 组件索引文件
│ │ └── style
│ │ └── index.less # 基础组件 - 组件样式文件
│ ├── comp-001/*
│ ├── comp-002/*
│ ├── index.less
│ └── index.ts
├── pnpm-workspace.yaml
├── scripts/*
└── tsconfig.json
|
从上述代码中可以看到,不同类型的组件库里的每个单独组件都有一个索引文件和样式文件作为入口进行管理。这样就能保证我们的组件格式都是统一的,而且有一一对应的功能源码文件和样式文件,最后编译结果也能通过对应路径找到对应的组件。
既然我们统一了组件的目录格式,那么接下来我们就要根据不同类型的对应组件目录,进行代码的编译。代码编译分成以下三个步骤:
- 第一步:编译TypeScript和Vue.js 3.x源码为ES Module和CommonJS模块的两种JavaScript代码文件;
- 第二步:编译出所有JavaScript文件的TypeScript类型描述文件;
- 第三步:把文件编译Less成CSS文件。
下面我们来详细解释下每一步操作。
先看第一步,也就是编译TypeScript和Vue.js 3.x源码成ES Module和CommonJS模块的两种JavaScript代码文件。我们需要在项目的 scripts/* 目录下编写以下编译脚本。
脚本文件是 scripts/build-module.ts,具体代码如下:
1
2
3
4
5
6
7
8
9
10
11
12
13
14
15
16
17
18
19
20
21
22
23
24
25
26
27
28
29
30
31
32
33
34
35
36
37
38
39
40
41
42
43
44
45
46
47
48
49
50
51
52
53
54
55
56
57
58
59
60
61
62
63
64
65
66
67
68
69
70
71
72
73
74
75
76
77
78
79
80
81
82
83
84
85
86
87
88
89
90
91
92
93
94
95
96
97
98
99
100
101
102
103
104
105
106
| import fs from 'node:fs';
import { rollup } from 'rollup'
import vue from '@vitejs/plugin-vue'
import vueJsx from '@vitejs/plugin-vue-jsx'
import VueMacros from 'unplugin-vue-macros/rollup'
import { nodeResolve } from '@rollup/plugin-node-resolve'
import commonjs from '@rollup/plugin-commonjs'
import esbuild from 'rollup-plugin-esbuild'
import glob from 'fast-glob'
import type { OutputOptions } from 'rollup';
import { resolvePackagePath } from './util';
const getExternal = async (pkgDirName: string) => {
const pkgPath = resolvePackagePath(pkgDirName, 'package.json');
const manifest = require(pkgPath) as any;
const { dependencies = {}, peerDependencies = {}, devDependencies = {} } = manifest;
const deps: string[] = [...new Set([
...Object.keys(dependencies),
...Object.keys(peerDependencies),
...Object.keys(devDependencies)
])];
return (id: string) => {
if (id.endsWith('.less')) {
return true;
}
return deps.some(
(pkg) => id === pkg || id.startsWith(`${pkg}/`)
)
}
}
const build = async (pkgDirName: string) => {
const pkgDistPath = resolvePackagePath(pkgDirName, 'dist');
if (fs.existsSync(pkgDistPath) && fs.statSync(pkgDistPath).isDirectory()) {
fs.rmSync(pkgDistPath, { recursive: true })
}
const input = await glob([
'**/*.{js,jsx,ts,tsx,vue}',
'!node_modules'
], {
cwd: resolvePackagePath(pkgDirName, 'src'),
absolute: true,
onlyFiles: true,
})
const bundle = await rollup({
input,
plugins: [
VueMacros({
setupComponent: false,
setupSFC: false,
plugins: {
vue: vue({
isProduction: true,
}),
vueJsx: vueJsx(),
},
}),
nodeResolve({
extensions: ['.mjs', '.js', '.json', '.ts'],
}),
commonjs(),
esbuild({
sourceMap: true,
target: 'es2015',
loaders: {
'.vue': 'ts',
},
}),
],
external: await getExternal(pkgDirName),
treeshake: false,
})
const options: OutputOptions[] = [
{
format: 'cjs',
dir: resolvePackagePath(pkgDirName, 'dist', 'cjs'),
exports:'named',
preserveModules: true,
preserveModulesRoot: resolvePackagePath(pkgDirName, 'src'),
sourcemap: true,
entryFileNames: '[name].cjs',
},
{
format: 'esm',
dir: resolvePackagePath(pkgDirName, 'dist', 'esm'),
exports: undefined,
preserveModules: true,
preserveModulesRoot: resolvePackagePath(pkgDirName, 'src'),
sourcemap: true,
entryFileNames: '[name].mjs',
}
]
return Promise.all(options.map((option) => bundle.write(option)))
}
console.log('[TS] 开始编译所有子模块···')
await build('components');
await build('business');
console.log('[TS] 编译所有子模块成功!')
|
以上的编译脚本,就是基于Rollup来遍历所有Vue.js 3.x源码文件和TypeScript文件,再进行一一对应的编译。
我们最后将编译出来的CommonJS模块格式文件命名成 *.cjs后缀的JavaScript文件,将ES Module模块格式文件命名成*.mjs后缀的JavaScript文件,为后续的package.json输出格式做准备。
最后生成的结果是以组件形式一一对应在每个子项目的dist目录下,如下所示:
1
2
3
4
5
6
7
8
9
10
11
12
13
14
15
16
17
18
19
| .
├── ...
├── packages
│ ├── components/
│ │ ├── dist/
│ │ │ ├── esm/
│ │ │ │ ├── comp-000/*
│ │ │ │ ├── comp-001/*
│ │ │ │ └── comp-002/*
│ │ │ └── cjs/
│ │ │ ├── comp-000/*
│ │ │ ├── comp-001/*
│ │ │ └── comp-002/*
│ │ └── src/
│ │ ├── comp-000/*
│ │ ├── comp-001/*
│ │ └── comp-002/*
│ └── ...
└── ...
|
接下来我们进入第二步,编译出所有JavaScript文件的TypeScript类型描述文件。这就需要在项目的 scripts/* 目录下编写以下编译脚本。
脚本文件是scripts/build-dts.ts,具体代码如下:
1
2
3
4
5
6
7
8
9
10
11
12
13
14
15
16
17
18
19
20
21
22
23
24
25
26
27
28
29
30
31
32
33
34
35
36
37
38
39
40
41
42
43
44
45
46
47
48
49
50
51
52
53
54
55
56
57
58
59
60
61
62
63
64
65
66
67
68
69
70
71
72
73
74
75
76
77
78
79
80
81
82
83
84
85
86
87
88
89
90
91
92
93
94
95
96
97
98
99
100
101
102
103
104
105
106
107
108
109
110
111
112
113
114
115
116
117
118
119
120
121
122
123
124
125
126
127
128
129
130
131
132
133
134
135
136
137
138
139
140
141
142
| import process from 'node:process'
import path from 'node:path';
import fs from 'node:fs'
import * as vueCompiler from 'vue/compiler-sfc'
import glob from 'fast-glob';
import { Project } from 'ts-morph'
import type { CompilerOptions, SourceFile } from 'ts-morph'
import { resolveProjectPath, resolvePackagePath } from './util';
const tsWebBuildConfigPath = resolveProjectPath('tsconfig.web.build.json');
function checkPackageType(project: Project) {
const diagnostics = project.getPreEmitDiagnostics();
if (diagnostics.length > 0) {
console.error(project.formatDiagnosticsWithColorAndContext(diagnostics))
const err = new Error('TypeScript类型描述文件构建失败!')
console.error(err)
throw err
}
}
async function copyDts(pkgDirName: string) {
const dtsPaths = await glob(['**/*.d.ts'], {
cwd: resolveProjectPath('dist', 'types', 'packages', pkgDirName, 'src'),
absolute: false,
onlyFiles: true,
});
dtsPaths.forEach((dts: string) => {
const dtsPath = resolveProjectPath('dist', 'types', 'packages', pkgDirName, 'src', dts)
const cjsPath = resolvePackagePath(pkgDirName, 'dist', 'cjs', dts);
const esmPath = resolvePackagePath(pkgDirName, 'dist', 'esm', dts);
const content = fs.readFileSync(dtsPath, { encoding: 'utf8' });
fs.writeFileSync(cjsPath, content);
fs.writeFileSync(esmPath, content);
});
}
async function addSourceFiles(project: Project, pkgSrcDir: string) {
project.addSourceFileAtPath(resolveProjectPath('env.d.ts'))
const globSourceFile = '**/*.{js?(x),ts?(x),vue}'
const filePaths = await glob([globSourceFile], {
cwd: pkgSrcDir,
absolute: true,
onlyFiles: true,
})
const sourceFiles: SourceFile[] = []
await Promise.all([
...filePaths.map(async (file) => {
if (file.endsWith('.vue')) {
const content = fs.readFileSync(file, { encoding: 'utf8' })
const hasTsNoCheck = content.includes('@ts-nocheck')
const sfc = vueCompiler.parse(content)
const { script, scriptSetup } = sfc.descriptor
if (script || scriptSetup) {
let content =
(hasTsNoCheck ? '// @ts-nocheck\n' : '') + (script?.content ?? '')
if (scriptSetup) {
const compiled = vueCompiler.compileScript(sfc.descriptor, {
id: 'temp',
})
content += compiled.content
}
const lang = scriptSetup?.lang || script?.lang || 'js'
const sourceFile = project.createSourceFile(
`${path.relative(process.cwd(), file)}.${lang}`,
content
)
sourceFiles.push(sourceFile)
}
} else {
const sourceFile = project.addSourceFileAtPath(file)
sourceFiles.push(sourceFile)
}
}),
])
return sourceFiles
}
async function generateTypesDefinitions(
pkgDir: string,
pkgSrcDir: string,
outDir: string
){
const compilerOptions: CompilerOptions = {
emitDeclarationOnly: true,
outDir,
}
const project = new Project({
compilerOptions,
tsConfigFilePath: tsWebBuildConfigPath
})
const sourceFiles = await addSourceFiles(project, pkgSrcDir)
checkPackageType(project);
await project.emit({
emitOnlyDtsFiles: true,
})
const tasks = sourceFiles.map(async (sourceFile) => {
const relativePath = path.relative(pkgDir, sourceFile.getFilePath())
const emitOutput = sourceFile.getEmitOutput()
const emitFiles = emitOutput.getOutputFiles()
if (emitFiles.length === 0) {
throw new Error(`异常文件: ${relativePath}`)
}
const subTasks = emitFiles.map(async (outputFile) => {
const filepath = outputFile.getFilePath()
fs.mkdirSync(path.dirname(filepath), {
recursive: true,
});
})
await Promise.all(subTasks)
})
await Promise.all(tasks)
}
async function build(pkgDirName) {
const outDir = resolveProjectPath('dist', 'types');
const pkgDir = resolvePackagePath(pkgDirName);
const pkgSrcDir = resolvePackagePath(pkgDirName, 'src');
await generateTypesDefinitions(pkgDir, pkgSrcDir, outDir);
await copyDts(pkgDirName);
}
console.log('[Dts] 开始编译d.ts文件···')
await build('components');
await build('business');
console.log('[Dts] 编译d.ts文件成功!')
|
以上代码是基于两个环节进行操作的,第一个环节是基于 vue/compiler-sfc 的Vue.js 3.x编译器,将Vue.js源码编译成 TypeScript代码,第二环节是结合原有其它TypeScript代码文件,进行TypeScript的类型文件生成。
具体结果如下所示:
1
2
3
4
5
6
7
8
9
10
11
12
13
14
15
16
17
18
19
| .
├── ...
├── packages
│ ├── components/
│ │ ├── dist/
│ │ │ ├── esm/
│ │ │ │ ├── comp-000/
│ │ │ │ │ ├── xxx.mjs
│ │ │ │ │ └── xxx.d.ts
│ │ │ │ └── **
│ │ │ └── cjs/
│ │ │ ├── comp-000/
│ │ │ │ ├── xxx.cjs
│ │ │ │ └── xxx.d.ts
│ │ │ └── **
│ │ └── src/
│ │ └── **
│ └── ...
└── ...
|
每个JavaScript结果文件(mjs/cjs格式),都有一个对应的 d.ts 的TypeScript类型声明文件,这样给其他子项目使用时,就可以直接在TypeScript里使用,在VS Code编辑器里直接显示类型提示。
第三步,也就是最后一步,我们要来把Less文件编译成CSS文件。我们需要在项目的 scripts/* 目录下编写以下编译脚本。
脚本文件是 scripts/build-css.ts,具体代码如下:
1
2
3
4
5
6
7
8
9
10
11
12
13
14
15
16
17
18
19
20
21
22
23
24
25
26
27
28
29
30
31
32
33
34
35
36
37
38
39
40
41
42
43
44
| import fs from 'node:fs';
import path from 'node:path';
import glob from 'fast-glob';
import less from 'less';
import { resolvePackagePath, wirteFile } from './util';
function compileLess(file: string): Promise<string> {
return new Promise((resolve, reject) => {
const content = fs.readFileSync(file, { encoding: 'utf8' });
less.render(content, {
paths: [ path.dirname(file) ],
filename: file,
plugins: [],
javascriptEnabled: true
}).then((result) => {
resolve(result.css);
}).catch((err) => {
reject(err);
})
})
}
async function build(pkgDirName: string) {
const pkgDir = resolvePackagePath(pkgDirName, 'src');
const filePaths = await glob(['**/style/index.less'], {
cwd: pkgDir,
});
const indexLessFilePath = resolvePackagePath(pkgDirName, 'src', 'index.less');
if (fs.existsSync(indexLessFilePath)) {
filePaths.push('index.less')
}
for (let i = 0; i < filePaths.length; i ++) {
const file = filePaths[i];
const absoluteFilePath = resolvePackagePath(pkgDirName, 'src', file);
const cssContent = await compileLess(absoluteFilePath);
const cssPath = resolvePackagePath(pkgDirName, 'dist', 'css', file.replace(/.less$/, '.css'));
wirteFile(cssPath, cssContent);
}
}
console.log('[CSS] 开始编译Less文件···')
await build('components');
await build('business');
console.log('[CSS] 编译Less成功!')
|
上述代码,主要是将Less文件以组件固定的目录格式一一对应编译到 dist目录里,具体编译结果如下所示:
1
2
3
4
5
6
7
8
9
10
11
12
13
14
15
16
17
18
19
20
21
22
| .
├── ...
├── packages
│ ├── components/
│ │ ├── dist/
│ │ │ ├── css/
│ │ │ │ ├── comp-000/
│ │ │ │ │ └── style
│ │ │ │ │ └── index.css
│ │ │ │ └── **
│ │ │ ├── esm/
│ │ │ │ ├── comp-000/
│ │ │ │ └── **
│ │ │ └── cjs/
│ │ │ ├── comp-000/
│ │ │ └── **
│ │ └── src/
│ │ └── comp-000/
│ │ └── style/
│ │ └── index.less
│ └── ...
└── ...
|
通过上述三步操作,我们可以发现最终编译结果是存在每个子项目里 dist/esm/*目录、dist/cjs/*目录和dist/css/*目录里,而且每个组件在这三个目录的位置都是可以一一对应找到的。
当我们把Vue.js组件库的源码都编译成JavaScript和CSS代码后,接下来我们就需要进入到使用组件库的环节了,也就是在其他项目中使用我们本项目里的组件库。
在其他项目中使用组件库
在讲解之前,我们回顾刚刚讲过的组件库开发要点,其中一个是可以支持组件的按需加载,也就是其他项目使用组件库的时候,可以按照自己需要使用个别组件,而不会把整个组件库全量打包。
所以在组件库发布到npm企业内部站点的时候,我们还需要在组件库子项目每个package.json文件里加上以下配置:
1
2
3
4
5
6
7
8
9
10
11
12
13
14
15
16
17
18
19
20
21
| {
"main": "dist/cjs/index.cjs",
"module": "dist/esm/index.mjs",
"types": "dist/esm/index.d.ts",
"exports": {
".": {
"require": "./dist/cjs/index.cjs",
"import": "./dist/esm/index.mjs",
"types": "./dist/esm/index.d.ts"
},
"./esm/*": {
"import": "./dist/esm/*/index.mjs",
"types": "./dist/esm/*/index.d.ts"
},
"./cjs/*": {
"require": "./dist/cjs/*/index.cjs",
"types": "./dist/cjs/*/index.d.ts"
},
"./css/*": "./dist/css/*"
}
}
|
以上配置就是可以让使用者在使用组件库的时候,可以全量使用,例如 ES Module格式使用:
1
2
| import { Comp001, Comp002 } from '@my/components'
import '@my/components/css/index.css'
|
换成 CommonJS格式使用:
1
2
| const { Comp001, Comp002 } = require('@my/components');
require('@my/components/css/index.css')
|
也可以按需使用组件库,避免出现构建器对代码全量打包,例如 ES Module格式使用:
1
2
3
4
| import Comp001 from '@my/components/esm/comp-001';
import Comp002 from '@my/components/esm/comp-002';
import '@my/components/css/comp-001/style/index.css';
import '@my/components/css/comp-002/style/index.css'
|
换成 CommonJS格式使用:
1
2
3
4
| const Comp001 = require('@my/components/cjs/comp-001');
const Comp002 = require('@my/components/cjs/comp-002');
require('@my/components/css/comp-001/style/index.css');
require('@my/components/css/comp-002/style/index.css');
|
至此,我们就完成Vue.js 3.x自研组件库的开发入门了。
总结
这节课核心是想带你学会Vue.js 3.x自研组件库的开发入门,这也是企业级Vue.js 3.x项目的进阶部分的第一课。自研组件库的重要性,简单来讲就是开源组件库满足不了企业的定制化需求,需要自研才能满足企业的特色组件库的需要。
我们总结一下组件库开发的三个要素:
- 用monorepo管理多种类型组件库,这类项目的代码管理方式,可以一个仓库同时聚合管理多个项目,让项目之间代码依赖使用更方便;
- 源码要编译成多种模块格式(CommonJS和ES Module),主要考虑到前端代码npm模块的时候,目前主流是ES Module模块格式,但还是存在很多传统的CommonJS模块格式的使用兼容。所以在开发自研组件库的时候,尽量要考虑这两种模块格式;
- 基于Less等预处理CSS语言来开发组件库的样式,由于CSS语言能力有限,无法像JavaScript那样可以使用各种编程逻辑和特性,所以需要借助CSS预处理语言进行开发CSS。
以上都是大厂内部实现组件库或者开源社区实现组件库的主流技术方案,同时本节课最后也根据主流组件库编译技术方案,通过实际的编译脚本实现,给你演示了如何进行源码编译,以及编译后组件库的结果目录的规范设计和作用。
这节课只是组件库开发入门,后续会逐步进阶增加难度,希望你能掌握本节课要点,为后续进阶学习打下扎实的技术基础。
思考题
组件库的按需加载实现方式,还有其它的方案吗?欢迎在留言区参与讨论,期待你的回答,我们下一讲见。